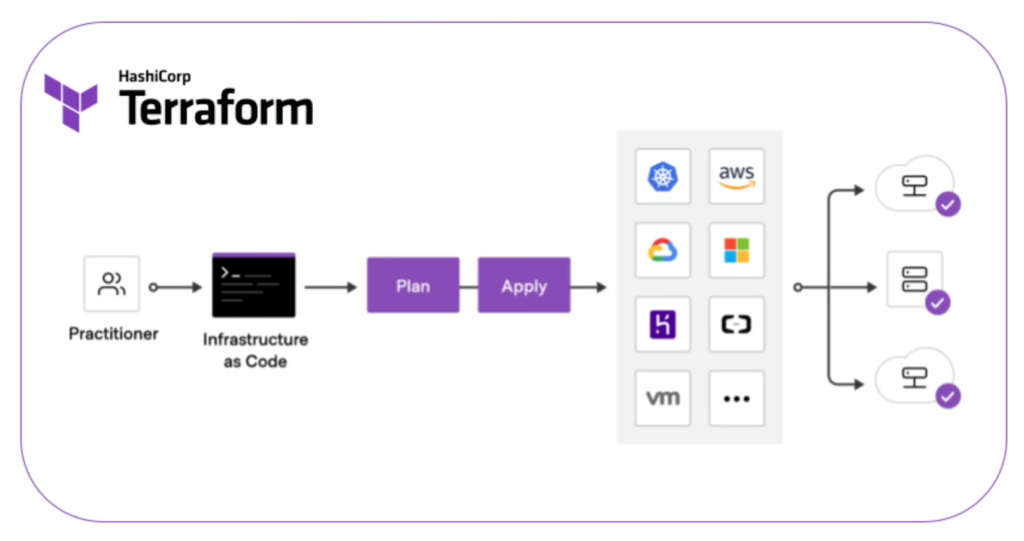
Before diving into Infrastructure as Code (IaC) and its meaning, it’s important to revisit the reasons behind its development. Many teams, when setting up environments and various infrastructure tools, have historically created their scripts for setup and maintenance. These scripts, written in languages like Shell, Python, Ruby, Perl, and others, handle different layers of an organization’s infrastructure.
While this approach can work with limited resources, it becomes less efficient as the scale grows. Over time, the increasing volume of resources and the complexity of maintaining them can lead to teams feeling overwhelmed and more prone to errors.
With that context in mind, it’s time to introduce the concept of IaC. So, what exactly is it?
Is the ability to provision and support your computing infrastructure using code instead of manual processes and settings. Any application environment requires many infrastructure components like operating systems, database connections, and storage. Developers have to regularly set up, update, and maintain the infrastructure to develop, test, and deploy applications.
Why Terraform?
Terraform supports the major cloud providers as well as self-hosted infrastructure. This flexibility is made possible through the use of providers, which are defined as:
Terraform relies on plugins called providers to interact with cloud providers, SaaS providers, and other APIs.
These providers are written in a unified, human-readable syntax that gets translated into infrastructure code, which runs behind the scenes when changes are applied. The vast number of providers and the ease with which Terraform can be learned are key reasons it has become one of the most widely used IaC tools.
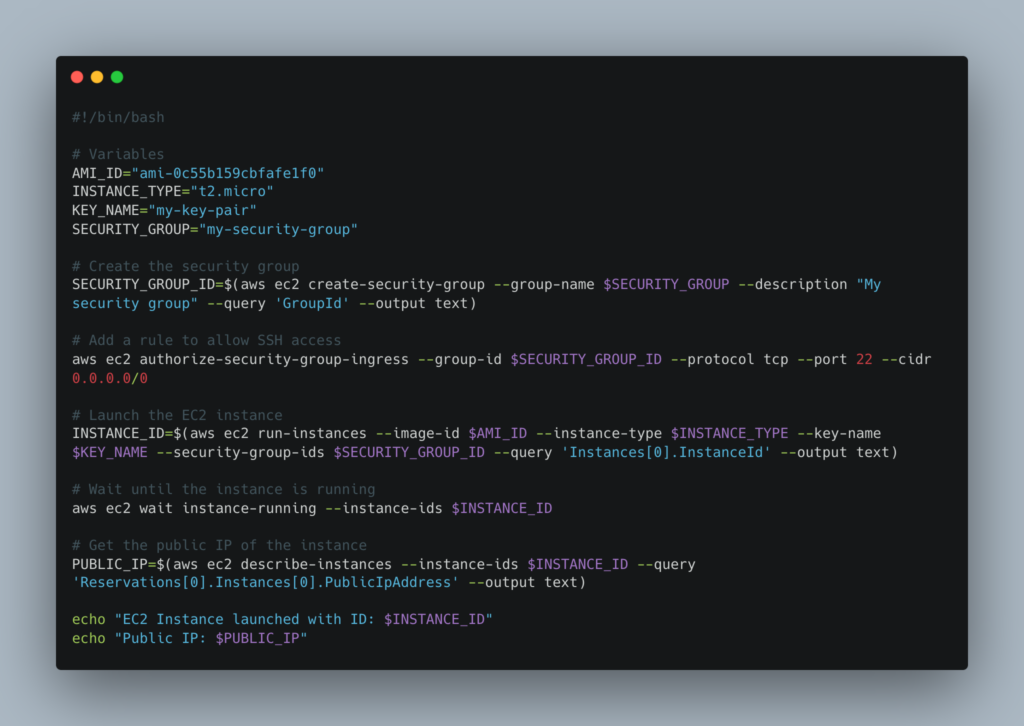
For example, below are two code snippets to deploy an ec2 instance: one written in a .sh script and the other in a .tf file.
ec2.sh file:
ec2.tf file:
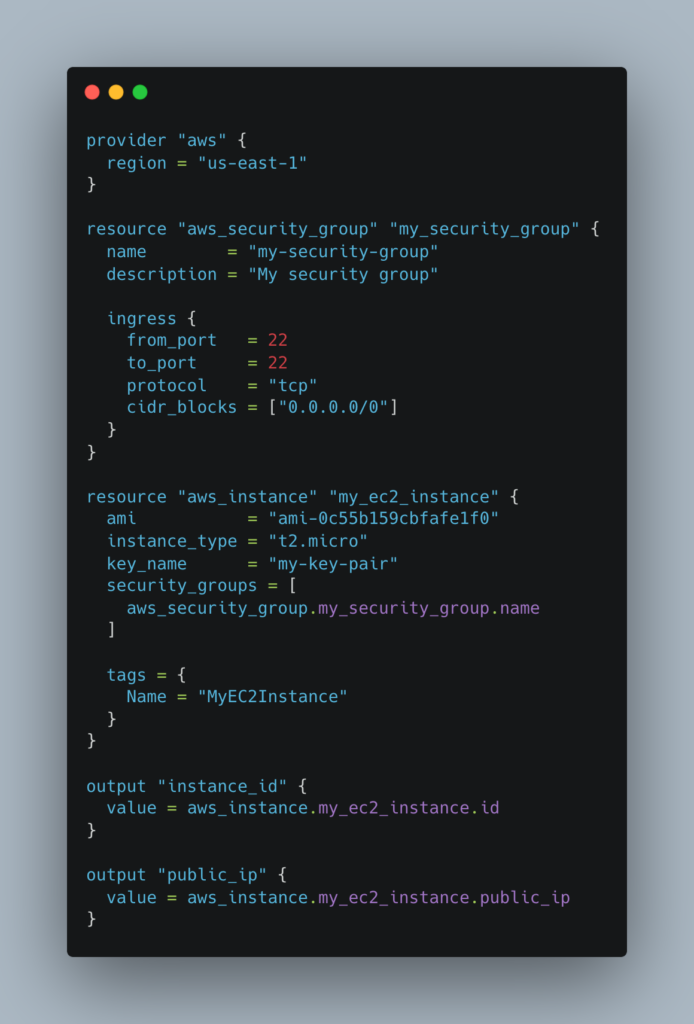
Over time, you’ll realize that building a file like the one above is more about understanding the syntax and structuring your .tf files by consulting the official documentation and utilizing the resources provided by the provider that you’re using.
The HashiCorp Configuration Language (HCL) is easy to read, write, and learn. I highly recommend referring to the official documentation as you learn Terraform.
The lifecycle
In Terraform, everything is managed as a (infrastructure) resource. These resources represent one of the hundreds (or possibly thousands) of infrastructure objects that can be created, updated, or destroyed using Terraform configuration files.
The basic syntax
These are the elements of a Terraform file:
resource "aws_vpc" "main" {
  cidr_block = var.base_cidr_block
}

<BLOCK TYPE> "<BLOCK LABEL>" "<BLOCK LABEL>" {
  # Block body
  <IDENTIFIER> = <EXPRESSION> # Argument
}
- Blocks are containers for other content and usually represent the configuration of some kind of object, like a resource. Blocks have a block type, can have zero or more labels, and have a body that contains any number of arguments and nested blocks. Most of Terraform’s features are controlled by top-level blocks in a configuration file.
- Arguments assign a value to a name. They appear within blocks.
- Expressions represent a value, either literally or by referencing and combining other values. They appear as values for arguments, or within other expressions.
(original source)
Practical example
Now that you’re familiar with the basic concepts, after installing Terraform, let’s try using a provider by running the main commands: terraform init, plan, apply, and destroy.
You can find all the available providers on the HashiCorp website. In the examples below, we’ll be using the local provider.
The structure for generating a simple file is as follows:
resource "local_file" "neighborhood" {
  filename = "/Users/allyxcristiano/Documents/workspace/example.txt"
  content  = "My neighborhood is Cohatrac."

  # Optional: Set the file's permissions
  file_permission = "0644"
}
Before moving forward, let’s explain the structure above:
- resource: This defines the block, and you can have as many blocks as needed in a file. It contains information about the infrastructure platform and the configuration you want to apply.
- local_file: This parameter defines the resource type and includes two key concepts. The part before the underscore,
localrepresents the provider (which usually remains the same), while the part after the underscore,filerepresents the resource you want to create. A single provider can manage multiple resources, so be sure to check the documentation to explore all available options. - neighborhood: This is the resource’s logical name, which can be anything you choose.
- filename, content, and file_permission: These are the arguments used to set up the resource. Arguments are specific to the provider you’re using, formatted as key-value pairs, and can be either required or optional.
Once you’ve created this file locally (adjust the file name according to your environment if you want to test), you can run the terraform init command.

As you can see in the picture above, the init command reads the .tf files in the current directory and downloads the necessary providers, preparing the environment for the next steps.
After initializing Terraform, the next step is to plan the execution. By running the terraform plan command, you can see whether the changes can be applied and compare the current state with the proposed changes.

After reviewing the diff if everything is as expected you can perform terraform apply to finally perform the changes in the resource.
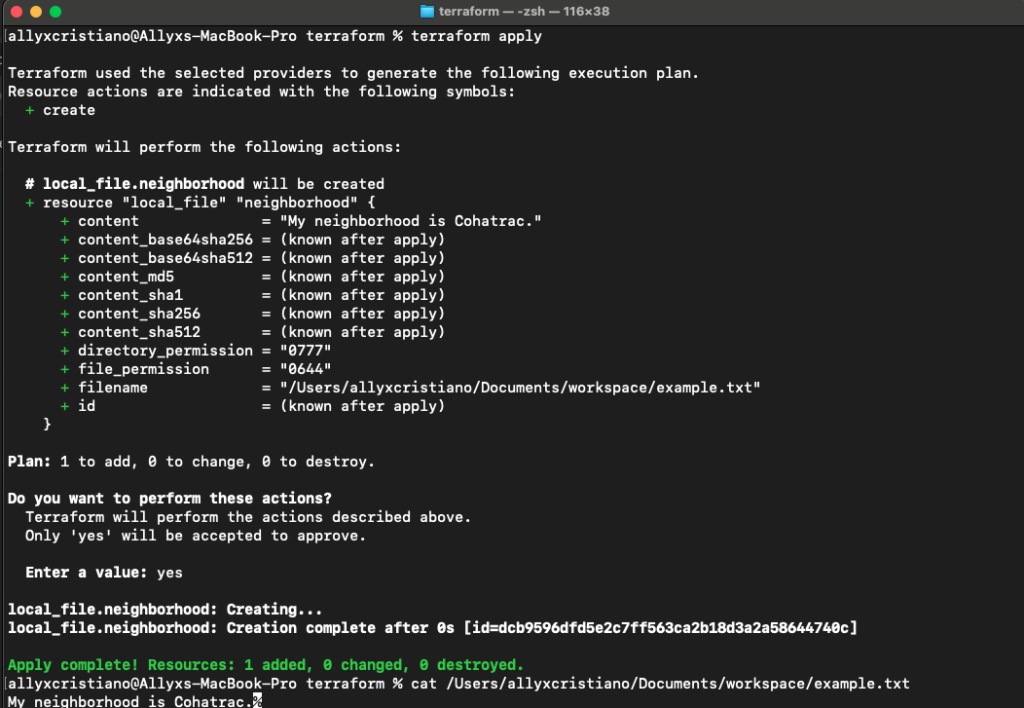
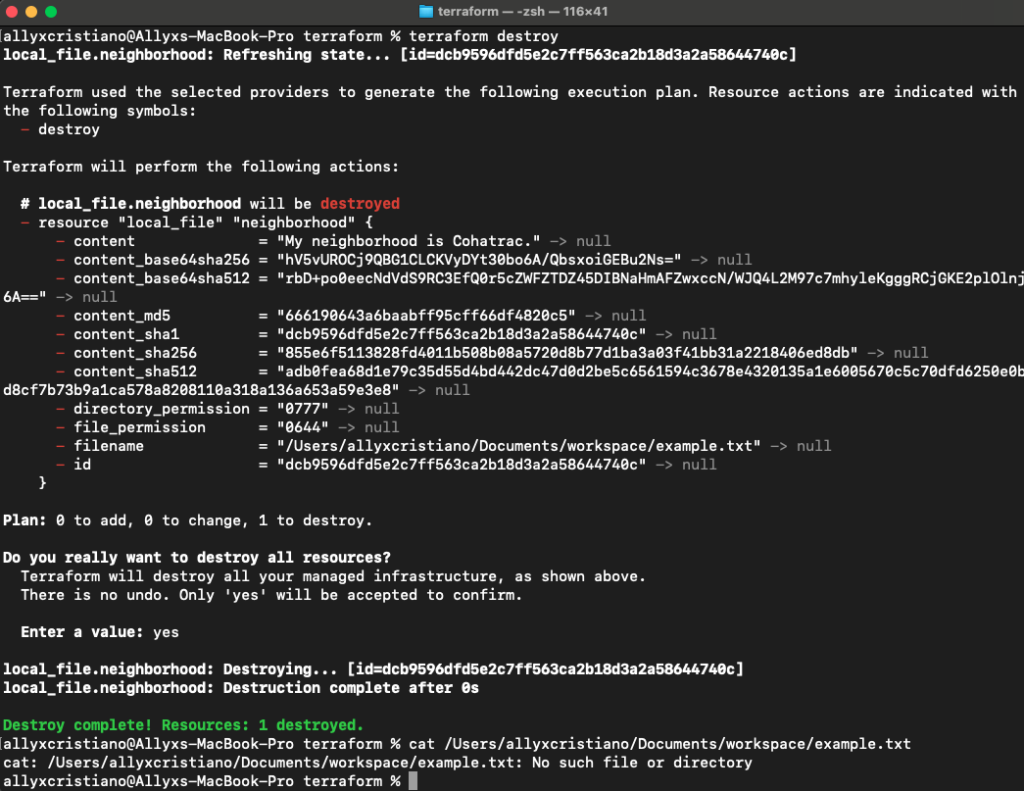
The terraform destroy the command is also available, it’s useful when it makes sense to remove the infrastructure (be careful).
What is next?
There are many commands not covered in this article, as well as important topics and details about the syntax in general. If you want to explore further and be fully prepared to use Terraform in a production environment, I highly recommend reading the official documentation and taking a course to practice and deepen your understanding. I’ve included two helpful links at the end of the article that can help with that.
Conclusion
At this point, I hope you can see that using Terraform isn’t as complex as it might seem, even for engineers who don’t have much experience with infrastructure. I’m not suggesting you won’t need to understand the components you’re managing through Terraform — you will — but it simplifies many aspects of the process.
The main advantages of using Infrastructure as Code (IaC) include the abstraction of various configuration layers, simplified maintenance, and the ability to easily replicate environments when needed. IaC also reduces errors by minimizing manual steps, allows for the reuse of numerous community-built providers, ensures consistency across environments, improves version control for infrastructure, and supporting automated testing and deployment processes. Overall, it creates a more streamlined and reliable infrastructure management workflow.
Useful links
https://developer.hashicorp.com/terraform
https://www.udemy.com/course/terraform-for-the-absolute-beginners
Leave a Reply